


Photo Backdrop Track System Hanging Instructions
1) The backdrop track system can be mounted to any type of ceiling. The system can be fixed directly to the ceiling by drilling holes in the track or can be mounted using the ceiling brackets that are provided.
2) Ceiling brackets should be placed approximately every 32" to 48" to properly support the system. The bracket should be aligned in order for the system to operate correctly.
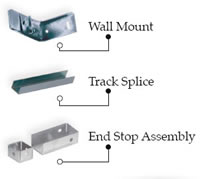
3) After installing the ceiling brackets, the track system should be mounted to the brackets. The track splices should be used to connect both straight and curved pieces.
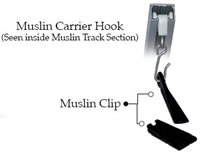
4) The end stop assembly should be placed at the end of the tracking. The end stop cap can be removed to install the backdrop carrier hooks.
5) The backdrop clip should then be attached to your cloth backdrop. (one clip every 12") place backdrop between the back of the clip and the eye and the slide upwards.
6) Then hang your cloth backdrop on the carrier hook onto the system.